Formatting Paragraph in Microsoft Word
How to Format the Paragraph
Microsoft Word provides us great features for formatting paragraph. Today you will learn formatting of paragraphs. That how can we format your paragraph to make look attractive.
Learn these all things in this chapter.
1. Alignments
2. Line Spacing
3. Shading
4. Border
1. Alignment - With alignment we can set the alignment of text. That our text, which will start, will start with what side it has written.
You can understand this in such a way that whenever we start writing in English or Hindi We always start typing from the right side. That's why the alignment of our right side is fine. That all the sentences are set in an alignment, on the line of our right side. And the left side alignment is a little ahead.
So for this Microsoft Word provides us 4 alignments.
i) Left Alignmentii) Center Alignment
iii) Right Alignment
iv) Justified Alignment
i) Left Alignment - This aligns our text with the left.That all the elements our text will be aligned left.
ii) Center Alignment - This aligns our text with the center.All the elements of our text will be aligned in center.
iii) Right Alignment - This aligns our text with the right.That all the elements of our text will be aligned in right way.
iv) Justified Alignment - As its name suggests, it justifies the text. It aligns your text with both left and right sides.
By looking at the given sample below, you can understand it well.
To set alignment of your paragraph, first remove that paragraph. Then set the alignment by clicking on the alignment button given above.
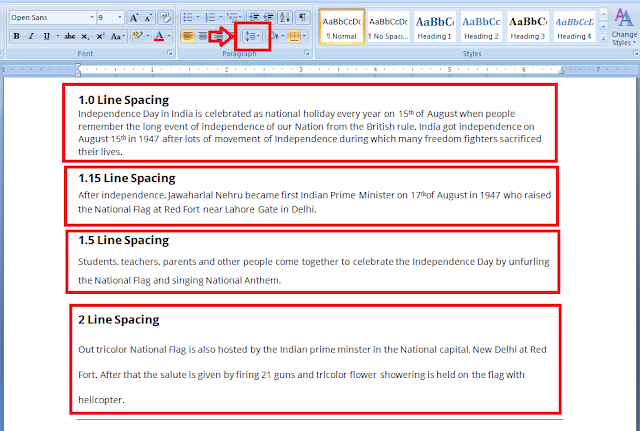
2. Line Spacing - You can define spacing between two lines by line spacing.
You do not have to select the paragraph to tell the line spacing. All you have to do is place your cursor on that paragraph, which paragraphs you want to set the line spacing.
Click on the down arrow in the top line spacing box and select line spacing.
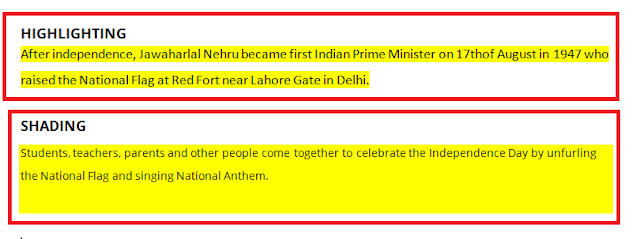
3. Shading - When we want to change the color of the background of our text, we use the shading.
With shading, we can color the background of our text. Microsoft Word provides us lots of color to color the background.
To change the background color, first select that paragraph. Then click on the shading button given above.
Difference between Highlighting and Shading
In hignlighting we highlight the text and in the shading we color the background of our text.
By looking at the given sample below, you can understand it well.
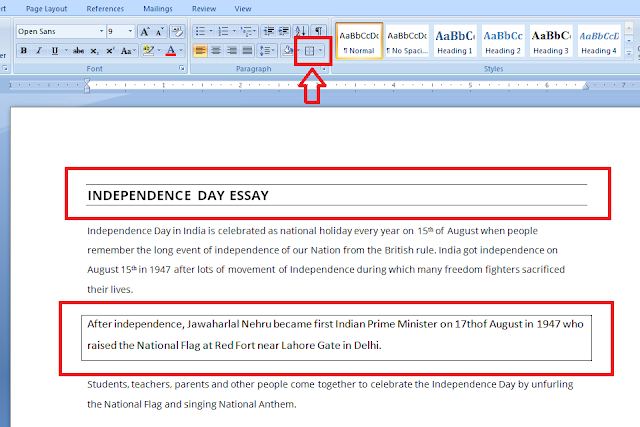
4. Border - As it is known by its name. With this help, we make a border around your text. We get many features to design the border in MICROSOFT WORD.
To make a border around your text, first select that paragraph. Then click on the down arrow button beside border button given above.
You can also use Shortcut Keys to do these operations.
1. Left Alignment - Ctrl + L
2. Center Alignment - Ctrl +E
3. Right Alignment - Ctrl + R
4. Justified Alignment - Ctrl + J
5. Single line spacing - Ctrl + 1
6. Double line spacing - Ctrl + 2
7. 1.5 line spacing - Ctrl + 5
6. Double line spacing - Ctrl + 2
7. 1.5 line spacing - Ctrl + 5
It is very important to remember the Shortcut Keys as it will ease your writing and increase your speed. So remember all these keys in mind.
Related Posts :
- Formatting in Microsoft Word
- Format Painter in Microsoft Word
- Clipboard in Microsoft Word
- Cut, Copy and Paste Text in Microsoft Word
- Recover Deleted Files from SD Card
We hope you have liked it. If you have any problem, then please comment on it. We do our best to help you.


