BTemplates.com

Full Width CSS

Copyright © 2017. All rights reserved by Mujahid Khan. Powered by Blogger.

Recent Posts

Contact Form

Name

Email *

Message *

Search This Blog

Videos

Column Left

Column Right

Carousel

Gallery

Feat

Recent Posts

Comments

recentcomments

Featured Posts

Formatting Paragraph in Microsoft Word


Formatting Paragraph in Microsoft Word


How to Format the Paragraph 


Microsoft Word provides us great features for formatting paragraph. Today you will learn formatting of paragraphs. That how can we format your paragraph to make  look attractive.


Learn these all things in this chapter.

1. Alignments
2. Line Spacing
3. Shading
4. Border

1. Alignment - With alignment we can set the alignment of text. That our text, which will start, will start with what side it has written. 

You can understand this in such a way that whenever we start writing in English or Hindi We always start typing from the right side. That's why the alignment of our right side is fine. That all the sentences are set in an alignment, on the line of our right side. And the left side alignment is a little ahead. 

So for this Microsoft Word provides us 4 alignments.

i)   Left Alignment
ii)  Center Alignment
iii) Right Alignment
iv) Justified Alignment

i)  Left Alignment - This aligns our text with the left.That all the elements our text will be aligned left.

ii)  Center Alignment - This aligns our text with the center.All the elements of our text will be aligned in center.

iii) Right Alignment - This aligns our text with the right.That all the elements of our text will be aligned in right way.

iv) Justified Alignment - As its name suggests, it justifies the text. It aligns your text with both left and right sides.

By looking at the given sample below, you can understand it well.

Alignments in Microsoft Word

To set alignment of your paragraph, first remove that paragraph. Then set the alignment by clicking on the alignment button given above.

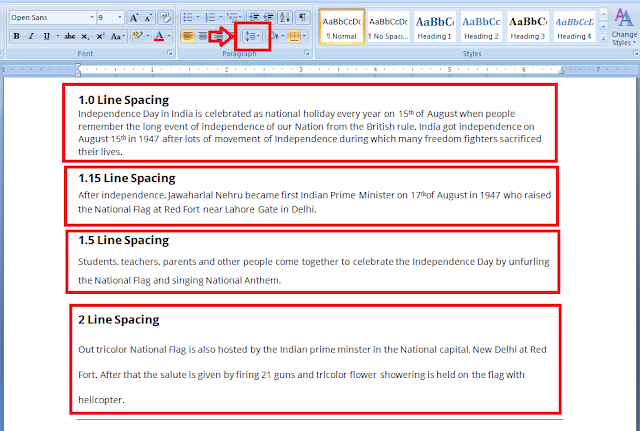
2. Line Spacing - You can define spacing between two lines by line spacing.

You do not have to select the paragraph to tell the line spacing. All you have to do is place your cursor on that paragraph, which paragraphs you want to set the line spacing.

Click on the down arrow in the top line spacing box and select line spacing.

Line Spacing in Microsoft Word


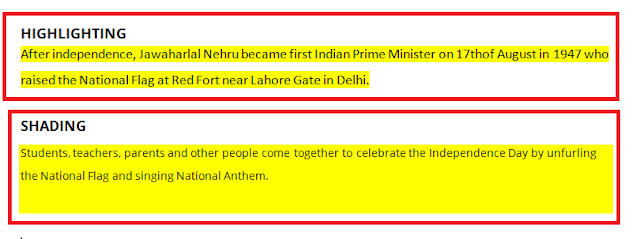
3. Shading - When we want to change the color of the background of our text, we use the shading.

With shading, we can color the background of our text. Microsoft Word provides us lots of color to color the background.

To change the background color, first select that paragraph. Then click on the shading button given above.

Shading in Microsoft Word


Difference between Highlighting and Shading

In hignlighting we highlight the text and in the shading we color the background of our text.

By looking at the given sample below, you can understand it well.

Difference between Highlighting and Shading

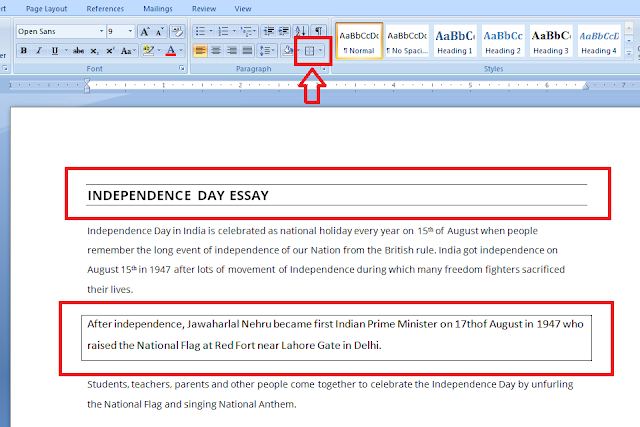
4. Border - As it is known by its name. With this help, we make a border around your text. We get many features to design the border in MICROSOFT WORD.

To make a border around your text, first select that paragraph. Then click on the down arrow button beside border button given above.

Border in Microsoft Word


You can also use Shortcut Keys to do these operations.


1. Left Alignment        - Ctrl + L
2. Center Alignment    - Ctrl +E
3. Right Alignment      - Ctrl + R
4. Justified Alignment  - Ctrl + J

5. Single line spacing - Ctrl + 1
6. Double line spacing - Ctrl + 2
7. 1.5 line spacing        -  Ctrl + 5


It is very important to remember the Shortcut Keys as it will ease your writing and increase your speed. So remember all these keys in mind.

Related Posts :


We hope you have liked it. If you have any problem, then please comment on it. We do our best to help you.


Formatting in Microsoft Word


Advance Formatting in Microsoft Word


Microsoft Word provides us great features for formatting text. Today, we will know about some more features of text formatting.

Learn these all things in this chapter.

1. Change Case
2. Text Highlight Color
3. Font Color
4. Clear Formatting

What is Change Case ?

1. Change Case - First of all, we will know what is the case in Microsoft Word. Whenever we write a document. So we have to write a document by keeping some things in mind. Just like when we have to use capital words and when to use small words.


So for that Microsoft Word provides a feature called Change Change. With the help of this we can convert words written in small letters into capital letters.

There are 5 types of cases found in change case.

i)   Sentence case
ii)  lower case
iii) UPPER CASE
iv) Capitalize Each Word
v) tOGGLE cASE

As we all know by the names of all these cases, what work these cases do. Still we do some discussion on these. Let's know about all these cases in detail.

i)   Sentence case - With the Sentence case we can capitalize the first letter of the first word of any sentence and the other letters are small.

ii)  lower case - With lower case we can make all the words and letters small of any sentence.

iii) UPPER CASE - With UPPER CASE we can make all the words and letters capital of any sentence.

iv) Capitalize Each Word - With this case, we can capitalize the first letter of all the words of any sentence.

v) tOGGLE cASE - With this case we can make the first letter small of all the words of any sentence .

To change the case of your senses, first select your Sentence, then from the Home tab, select the case of your choice from change case.

Like I have selected every case for five sentences here below.

Formatting in Microsoft Word

2. Text Highlight Color - This is used to highlight the text. As you have used the hinghtner in your school. This works the same way. This highlights the background of your text.


To highlight your text, first select it and click on the down arrow side of the ab button, and select the color of your choice.

Formatting in Microsoft Word


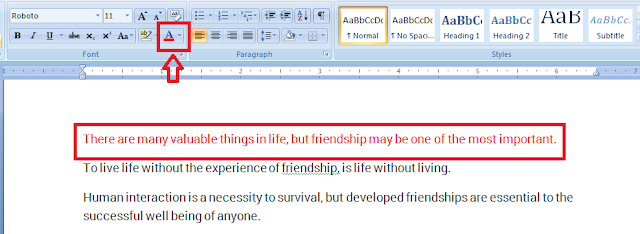
3. Font Color - With font color we can choose the color of our text. As we like to give color to our font, we can select those colors from here.


To change color of your text, first select it and click on the down arrow side of the A button, and select the color of your choice.

Formatting in Microsoft Word


4. Clear Formatting - As its name suggests, it clears all the formatting of our text. Whatever formatting we have done on the text, it will clear all the formatting.

To clear formatting of your text, first select it and click on the Aa button above. The entire formatting of your text will be cleared.


You can also use Shortcut Keys to do these operations.


1. Change Case               - Shift + F3
2. Text Highlight Color  - Ctrl + Alt + H
3.Clear Formatting         - Ctrl + Space

It is very important to remember the Shortcut Keys as it will ease your writing and increase your speed. So remember all these keys in mind.

Related Posts :


We hope you have liked it. If you have any problem, then please comment on it. We do our best to help you.


Formatting the text in Microsoft Word


How to Formatting the Text 

Microsoft Word gives us great features for formatting text. Today, we will know about some of the features of text formatting.

Learn about all these things in this chapter.

1. Strikethrough
2. Subscript
3. Superscript
4. Grow Font
5. Shrink Font

1. Strikethrough - From Strikethrough, we can draw the line between the text. It looks like the text is chopped. When we want to show any text cut, we use strikethrough.

Like I want to cut this text, First I will select this text .

Formatting the text in Microsoft Word


After that I will click on the abc button given above, which is cut off.

Formatting the text in Microsoft Word


2. Subscript - From the subscript we can put your text down a bit below the baseline. As you have read the equaution of water in Chemistry. 

For Example -  Equaution of water . H2O . 

Here 2 is always written down a bit below the line. You can use a subscript to minimize such equation or something else.

3. Superscript - We use superscript when we have to write text a bit above the line. Just as you have read in Math's formula.

For Example - sin2(x) + cos2(x) = 1

Here 2 is always written up a bit above the line. You can use a superscript to make such formula's or something else.

To do both of these work, first select the text. Then click on the subscript and superscript buttons above.

Just like I have to send 2 just a little over the line. So I'll select 2 and click on the superscript button.

Formatting the text in Microsoft Word


4. Grow Font - As it is known by its name. By doing this, we can grow your font, that means we can increase the size of our text.


5. Shrink Font - As it is known by its name. By doing this, we can shrink you font, that is, we can reduce the size of our text.

To increase or decrease the text size , first select the text. Then click on the Grow or Shrink button above.


Formatting the text in Microsoft Word


You can also use Shortcut Keys to do these operations.


1. Subscript        - Ctrl + = (Equal Sign)
2. Superscript     - Ctrl + Shift + = (Equal Sign)
3. Grow Font      - Ctrl + Shift + > (Greater than Sign)
4. Shrink Font    - Ctrl + Shift + < (Less than Sign)

It is very important to remember the Shortcut Keys as it will ease your writing and increase your speed. So remember all these keys in mind.

Related Posts :

We hope you have liked it. If you have any problem, then please comment on it. We do our best to help you.


Change the Font Color, Size or Type in Microsoft Word


What is Font ?

Font - Font is a very useful part of our text. This sets the visibility of our text. That's how our text will look. Microsoft Word gives us many more features to make text more attractive.

Learn about all these things in this chapter.

1. Font Face
2. Font Size
3. Bold
4. Italic
5. Underline

1. Font Face - This allows us to set the face of the text. That's how our text will be styled. How will he look. Microsoft Word provides us lots of font whereby we can make our document more attractive.


To change the font of your text, first select your text and then click on the arrow in the side of the font. Here you will see a lot of fonts, select any of the font you like.

Change the Font Color, Size or Type in Microsoft Word


As I selected "Adobe Gothic Std B" font here and my font changed to "Adobe Gothic Std B" font.

Change the Font Color, Size or Type in Microsoft Word


2. Font Size - We can change the font size from the font size option.. From the font size, we can make the text smaller or enlarged. It has size ranging from 8 to 72.


To change the font size, first we select the text and then click on the font option and select the font size.

Change the Font Color, Size or Type in Microsoft Word


Here is my font size here 12. I'm going to make my font size to 18.

Change the Font Color, Size or Type in Microsoft Word


3. Bold - From bold we can make text a bit thicker. This makes the text bold.


Change the Font Color, Size or Type in Microsoft Word


To make text bold, first we select the text and then click on the B button.

Change the Font Color, Size or Type in Microsoft Word


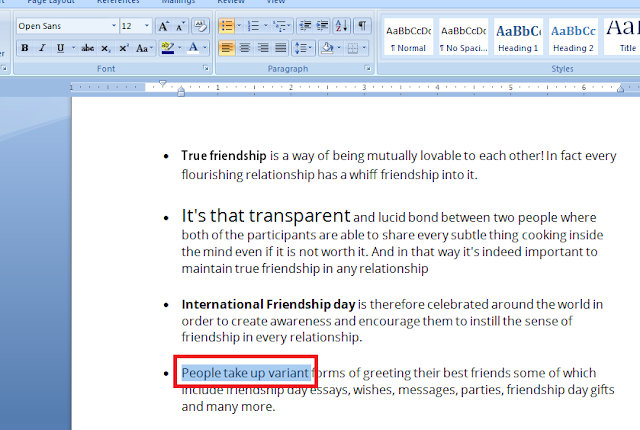
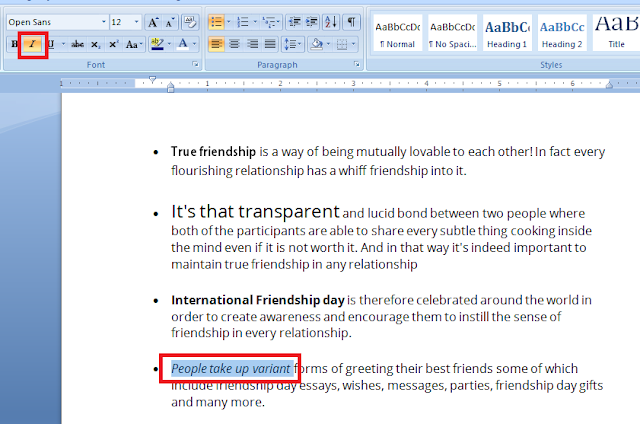
4. Italic- From Italic we can make our text slightly sloping in the right way, which will make our text even more attractive.


Change the Font Color, Size or Type in Microsoft Word


To make text italic, first we select the text and then click on the I button.


Change the Font Color, Size or Type in Microsoft Word


5. Underline - By underline, we can underline our text underline.


Change the Font Color, Size or Type in Microsoft Word


To make text Underline, first we select the text and then click on the U button. You can underline several types by clicking the arrow in the side of the U button.


Change the Font Color, Size or Type in Microsoft Word


You can also use Shortcut Keys to do these operations.

  • To Increase Font Size     -  Ctrl + Shift + >
  • To Decrease Font Size   - Ctrl + Shift + <
  • To Bold                           - Ctrl + B
  • To Italic                           - Ctrl + I
  • To Underline                  - Ctrl + U

It is very important to remember the Shortcut Keys as it will ease your writing and increase your speed. So remember all these keys in mind.

Related Posts :


We hope you have liked it. If you have any problem, then please comment on it. We do our best to help you.


English to Hindi Typing


How to type in Hindi 

Sometimes we need to type in Hindi. For this, Google provides a great tool, Google Input Tools. From which we can easily type in Hindi without any font or without any problem.

For this we just need to download a tool Google Input Tools. With the help of this tool, you can do not only type in Hindi but also in Arabic, Urdu, Gujarati or Bengali and other many languages.

Click the link below to download Google Input Tools.


How to install Google Input and type in Hindi

Step 1 - First click on the link given above.

Step 2 - Some such window will open. First you have to select language. Since we are typing in Hindi, select "Hindi" for it.

Step 3 - After selecting Hindi.  Select the "I agree to the Google Terms of Service and Privacy Policy" option. Then click on the download button.


English to Hindi Typing


Your Google Input Tools software will start downloading.

This is a 1 MB  software, after downloading it double click to install it. To nstall, you have to turn on your Internet connecton.

Once installed, it will start showing in your taskbar. 

English to Hindi Typing


Click on to select Hindi.

English to Hindi Typing

Step 4 - Now, to start typing, open any of your text editors. Like Microsoft Word. Type anything in it that you want to write in Hindi. And it will be converted to Hindi itself.


Step 5 - Now as you write in the English words, it will be converted to Hindi itself.

For Example :

English to Hindi Typing


Related Posts :


We hope you have liked it. If you have any problem, then please comment on it. We do our best to help you.


Clipboard in Microsoft Word


What is Clipboard ?

Whenever we copy or cut any text, that text is saved on our clipboard. This gives us the advantage that when we have to paste a text in many places, we do not need to find that text repeatedly.

And we get all our copied text in one place so that if we have to paste that text again. So we just need to place our cursor there and click on the text from the clipboard that we want to paste.

Clipboard is a very awesome tool in Microsoft Word. Which makes it easy for us to write a document.

To open the clipboard, go to the Home tab . And click on the arrow in front of the clipboard.

Clipboad in Microsoft Word

After clicking on the arrow, a clipboard window will open in the right side of your document. As shown below. My clipboard is now empty because I have not cut or copy anything yet.

Clipboad in Microsoft Word

Now as soon as I copy or cut 3 points of the essay, they will start showing in the clipboard.

Clipboad in Microsoft Word

Now I can paste it where I want it.


Related Posts :


We hope you have liked it. If you have any problem with Microsoft Word or in this tutorial, then please comment on it. We do our best to help you.

Cut, Copy and Paste Text in Microsoft Word


How to Cut, Copy and Paste Text in Microsoft Word

Cut, copy and paste in Microsoft Word is the option that we use many times whenever we make any document. It is very easy to use them.

Cut- This option is used by us when we want to remove any text from one place and place it somewhere else.

Copy - As its name suggests, it is used to copy any text.

Paste - Whenever we copy or cut, we will have to use the paste option to place text every other time.


Like in this essay I want to bring 4th Point above 3rd Point. So for this, first of all, I need to select 4th point and then click on the cut button in Home Tab.

Cut, Copy and Paste Text in Microsoft Word

After clicking on the cut button, your text will disappear from there.

Now where my 2nd Point of essay is ending. I take the cursor over there and press Enter. A new 3rd Point will come. Now place a cursor on the 3rd Point here and click on the paste button.

Cut, Copy and Paste Text in Microsoft Word


Now your text will be pasted.

And we will also use the same method to copy any text.

You can also use Shortcut Keys to cut, copy and paste.

1. Cut    - Ctrl + X
2. Copy - Ctrl + C
3. Paste - Ctrl + V

It is very important to remember the Shortcut Keys as it will ease your writing and increase your speed. So remember all these keys in mind.

Related Posts :


We hope you have liked it. If you have any problem, then please comment on it. We do our best to help you.

Save Webpage as PDF


How to Save Webpage as PDF

When we are reading something on the internet, sometimes the post is so long that we can not read the entire post once. So the best option for this is that we save that page and the best way to save is to save it in pdf. It is very easy to save webpage in pdf.

Follow the options below to save webpage to pdf.

Step 1 - First of all open the post or webpage you want to save. Here I want to save the post The Steve Jobs Speech in Hindi from  Achchikhabar.com (Achchikhabar.com is a very good website for inspirational stories in Hindi) so I opened it in my browzer.


Save Webpage as PDF

You can read this post by clicking here

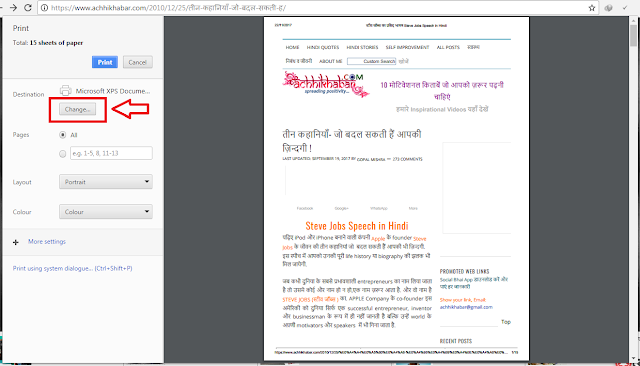
Step 2 - Now you right click on this page and select the print option. Or you can also call it by using Ctirl + P Shorchut.

Now you will have some such window open. In this, you can click on the Change button in front of the Destination option.

Save Webpage as PDF


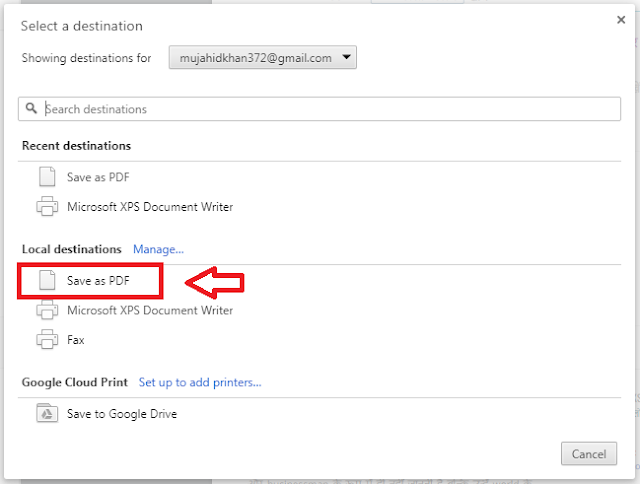
Step 3 - A new window will open. You must select a Save as PDF option in your window. This option can be above or below in your window.


Save Webpage as PDF


Step 4 - You will see now where the button of the print was coming, there is now a button to save the button. Here you have to click on this save button and your webpage will be saved in pdf file.


Save Webpage as PDF


Related Posts :


We hope you have liked it. If you have any problem, then please comment on it. We do our best to help you.


Format Painter in Microsoft Word


How to use Format Painter in Microsoft Word

We sometimes have to apply one formatting to another text but we have done lots of formatting on this, so we will take a lot of time to do all the formatting. You do not need to panic. For this, we get a option in Microsoft Word so that we do not have to do all the formattings again, we can copy formatting of that text. For this, we get the option called Format Painter, so that we can copy formatting.

Format Painter in Microsoft Word

For this, you have to follow the steps given below.


Step 1- First select the text whose formatting you want to copy.


Format Painter in Microsoft Word

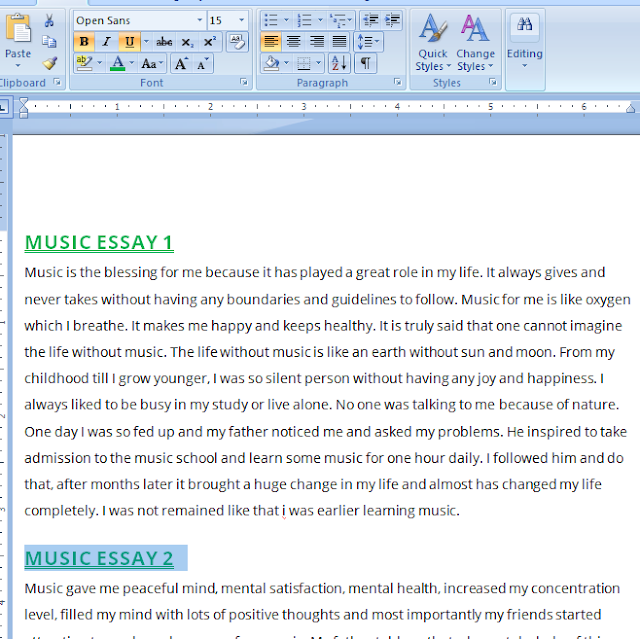
Like I want to copy the formatting of the Music Essay 1 here, so I selected it.


Step 2 - Now click on the Format Painter in the Home tab. On clicking, the Format Painter will be selected and your mouse cursor will be look like a Burush with Cursor.


Format Painter in Microsoft Word

Step 3- Now move your mouse over the text you want to copy formatting and select the text. I want to format it here on Music Essay 2 so I have selected it and formatting applied to it.


Format Painter in Microsoft Word


Now your formatting has been applied

This formatting is a great feature of copying formatting Microsoft Word May.


You can also use Shortcut Keys to do these operations.

1. To Copy the Formatting       -  Ctrl + Shift + C
2. To Paste the Formatting       -  Ctrl + Shift + V


It is very important to remember the Shortcut Keys as it will ease your writing and increase your speed. So remember all these keys in mind.

Related Posts :


We hope you have liked it. If you have any problem, then please comment on it. We do our best to help you.


Find out Computer Graphics Card

How to know Computer RAM, Graphics Card, Processor and Storage Details


Hello friends,

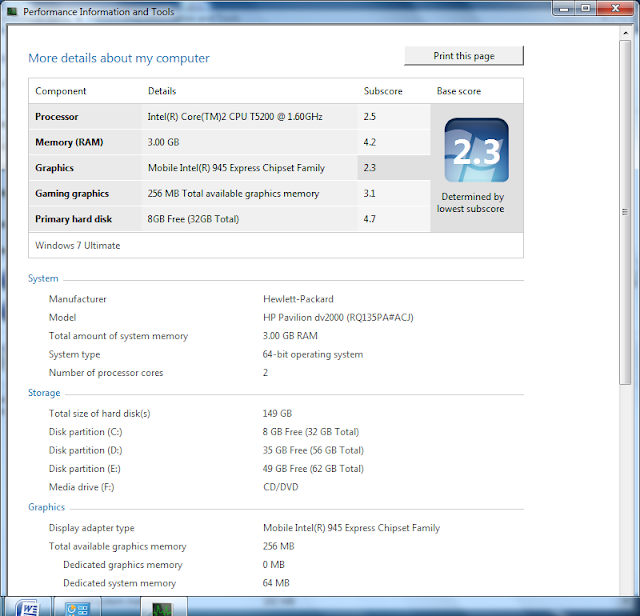
Today I will tell you how to know the computer's graphic memory, RAM and hard disk, there are many ways to find out all this but I will tell you the easiest way to get the full information about your system.

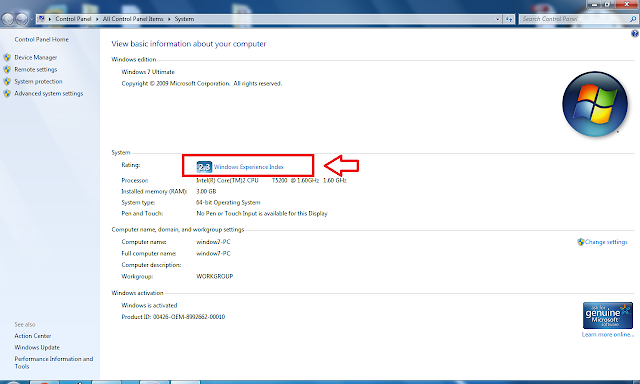
Step1- First, right-click on the computer icon on your desktop and open the properties.

Step 2- Then click on the Window Experience Index in front of the rating. After this your window will open like this.


Find out Computer Graphics Card


Step 3- Now here you have to click on View and Print Determined Performance and System Information, after which a new window will open which gives you complete information about your system.


Find out Computer Graphics Card


Find out Computer Graphics Card

Here you will get the complete information related to the system.


Related Posts :


We hope you have liked it. If you have any problem, then please comment on it. We do our best to help you.

Download Youtube Videos


How to download Youtube Videos


Hello Friends,

We all need to download videos from youtube. But there are very few people out there who know how to download videos from youtube.

I will tell you an easy and exciting way to download videos from youtube today. For this, you need to download a software that is totally free.

Step 1 - First of all, download this software by clicking on the link given below and after downloading it install it.


After installing it will look something like this.

How to download Youtube Videos

Step 2 - After this you just have to open the youtube video that you have to download and copy the link and paste it to this software. You can also choose video quality in it.


How to download Youtube Videos


Step 3 - After you paste the link and select Video Quality, you just have to click on the download button.


How to download Youtube Videos


And your video will start downloading

Friends, this is a very easy and safe way to download youtube videos as it does not have to buy the software, it is a completely free software.


Related Posts :

If there is still a problem in downloading, let us know in the comments section. We will definitely help you.

Download Videos from YouTube


How to Download Videos from YouTube 


Most of us need to download videos from YouTube. This video can be from any song or movie or anything else, so today I will tell you how to download the video from the IDM. With IDM we can download videos very easily and very quickly.

Step 1 - First, click on the link below to download the IDM and install it.

Download Internet Download Manager

Step 2 - Open your web browser like Google Chrome or Mozilla Firefox. There will be a message IDM integration extension activated, if not visible, then you restart the web browser.

Step 3 - Play your favorite video on youtube which you want to download.

Step 4 - On the side of the video, a download box will appear, click on it, select video quality and click on the start download button. Your video will start downloading.


How to Download Videos from YouTube

This is the easy and fast method to download YouTube video. I hope you enjoy it.

Related Posts :

If there is still a problem in downloading, let us know in the comments section. We will definitely help you.

Download YouTube Videos without any software


How to Download YouTube Videos without any software 


Hello friends, Today we are going to learn how to download YouTube videos without any software. There are usually other software like IDM (Internet Download Software) or YouTube Video downloader to download YouTube videos, but if we download YouTube videos without any software then let's start.

Step 1 - First of all go to YouTube.

Step 2 - Enter the name of video of whom you want to download and open it.


How to Download YouTube Videos without any software


Step 3 - Then go to the URL of video.


How to Download YouTube Videos without any software


Step 4 - Now type “ss” before the YouTube and press enter.


How to Download YouTube Videos without any software


Step 5 - This will let you to the savefrom.net site. Now select the video quality of which you want to download and press the download button.


How to Download YouTube Videos without any software


And your video will start to download. This is the easy and fast trick to download to download YouTube video. I hope you enjoy it. If there is still a problem in downloadg, let us know in the comments section. We will do our best to help you.


Related Posts :

If there is still a problem in downloading, let us know in the comments section. We will definitely help you.